Whether you are completing a new home wiring project, organizing messy cables in an office, or upgrading an electrical system, PVC cable trunking is one of the most practical, affordable, and beginner-friendly solutions for keeping cables protected and neatly arranged. This PVC cable trunking tutorial will walk you through every critical step, from material selection to final installation, so you can complete a clean, safe, and professional-looking project even if you have limited electrical work experience. PVC (polyvinyl chloride) trunking is popular for good reason: it is non-conductive, moisture-resistant, fire-retardant, and far lighter and cheaper than metal alternatives, making it ideal for most residential and light commercial applications. Before you start any installation, understanding the basics and preparing properly will save you time and avoid common mistakes.
First, you need to select the correct size and type of PVC cable trunking for your specific project. Trunking comes in a wide range of widths and depths, and the size you choose depends entirely on how many cables you plan to run through it. As a general rule of thumb, you should leave 20 to 30 percent extra space inside the trunking for future cable additions or ventilation. For example, if you are running three or four low-voltage data cables, a 25mm x 25mm trunking is usually sufficient, while a full set of household power cables may require a 50mm x 100mm trunking to accommodate all wires safely. You also need to decide between surface-mounted and flush-fit trunking. Surface-mounted is the easiest for beginners, as it can be installed directly onto walls or ceilings without any chasing or plaster work, while flush-fit is used for a more seamless, concealed finish in new construction or full renovations. Additionally, make sure to pick up all the necessary accessories before you start, including end caps, corner joints, T-connectors, adhesive, mounting clips, and a matching PVC lid. Having all parts on hand will prevent unnecessary mid-project trips to the hardware store.
Secondly, proper preparation of your work area and measurement is key to a smooth installation. Start by mapping out the route of your trunking on the wall or ceiling with a pencil and a spirit level. It is important to plan the route to avoid existing electrical wires, plumbing pipes, or structural studs, especially if you are drilling into walls. You can use a stud finder and pipe detector to check for hidden utilities before you mark any lines. When measuring, cut your trunking pieces one at a time instead of cutting all of them at once, as minor adjustments are often needed when working around corners or obstacles. Use a fine-tooth hacksaw or a PVC cutting tool to get a clean, straight cut, and sand down any rough edges with fine-grit sandpaper to prevent the sharp plastic from damaging cable insulation or cutting your hands during installation. Wipe down all cut edges with a clean cloth to remove any plastic dust before you proceed.
Next, it is time to install the base of the PVC trunking. For surface-mounted trunking, you have two main installation options: adhesive bonding or screw fixing. If you are installing on a smooth, clean wall or tile, strong solvent cement or construction adhesive is usually sufficient for light to medium weight cables. Apply a thin, even layer of adhesive to the back of the trunking base, press it firmly onto the wall along your marked line, and hold it in place for 30 to 60 seconds to ensure a strong bond. Then, add a few strips of masking tape to hold it while the adhesive dries completely, which usually takes 24 hours. If you are installing heavier cables or mounting on an uneven or porous surface like brick or unfinished drywall, screw fixing is more secure. Drill pilot holes through the mounting flanges of the trunking base every 30 to 40 centimeters, insert wall plugs if needed, and drive in the screws to hold the base firmly in place. Make sure the base remains level as you work, checking with your spirit level after every few screws to avoid a crooked final result.
Once the base is secured and the adhesive is fully dried, you can start pulling your cables through the trunking. It is best to lay all your cables out along the base before you close the lid, making sure they are not tangled or stretched too tight. If you are running multiple types of cables, such as power cables and data cables, you can use internal dividers (available for most standard trunking sizes) to separate them and prevent electrical interference. Leave a few extra centimeters of cable at each end to make connecting to outlets or junction boxes easier later. Check that all cables lie flat inside the base and do not bulge out over the edges, as this will prevent the lid from fitting properly.
Finally, you can attach the lid and finish the project. Most PVC trunking lids simply snap into place along the mounting grooves on the base, starting from one end and working your way to the other to ensure a tight, even fit. If the lid feels loose, you can add a small dot of adhesive at a few points along the base to hold it in place, but avoid using too much adhesive, as you may need to remove the lid to add or adjust cables later. Fit your end caps and corner joints to cover any exposed cut ends, and wipe down the entire trunking with a damp cloth to remove any pencil marks, dust, or adhesive residue. Once complete, your cables are fully protected from damage, moisture, and accidental contact, and your space looks far cleaner and more organized than it would with loose cables running along walls.
In conclusion, installing PVC cable trunking is a straightforward project that most beginners can complete in a few hours with basic tools and the right preparation. By following this guide, you can achieve a professional-looking result that protects your cables and improves the safety and appearance of any space. Always remember to turn off the main power supply before working with electrical cables, and if you are unsure about any part of your project, consult a licensed electrician to ensure compliance with local electrical safety codes.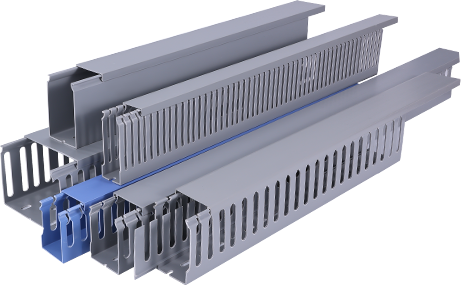
PVC Cable Trunking Tutorial: A Complete Step-by-Step Guide for Beginners
by
Tags:
Leave a Reply