If you have ever dealt with messy loose cables around your home, office or workshop, you have probably considered using PVC cable trunking to tidy things up and keep your wiring safe. PVC cable trunking is a popular, affordable and durable solution for concealing and protecting electrical cables, and it is surprisingly manageable for even beginner DIY enthusiasts to install. Whether you are looking to tidy up entertainment wiring along a wall, organize network cables in a home office, or run new electrical wiring for a room addition, understanding how do I PVC cable trunking correctly will help you achieve a clean, professional-looking result that lasts for years. This guide will walk you through every key step, from preparation to finishing, to make your trunking installation go smoothly.
First, before you start any installation work, you need to gather the right tools and materials and prepare your work area properly. For a standard PVC cable trunking project, you will need the trunking pieces themselves (cut to rough lengths or bought in full sections), a measuring tape, a pencil, a hacksaw or PVC cutter, a level, sandpaper, adhesive or screws (depending on your mounting surface), a drill (if using screws), and a wire stripper if you are working with new wiring. You should also double check the size of the trunking you need: make sure it is wide enough to hold all the cables you plan to conceal, leaving a little extra space for any future additions. Before marking any positions, turn off the power to any existing electrical lines in the area to avoid safety hazards, and clean the wall or surface where you will install the trunking to remove dust and grease that could prevent adhesive from sticking properly.
Secondly, you need to measure and cut your PVC trunking to fit your planned route accurately. Start by mapping out the route your cables will take: most people run trunking along skirting boards, ceiling edges, or around door frames for a discrete look that blends into the room. Use your measuring tape to mark each section of the route, and mark cutting lines on the PVC trunking with a pencil. If you need to go around a corner, you can buy pre-formed corner connectors that make the job neat, or cut a 45-degree angle on two ends of trunking to join them around an external or internal corner. When cutting, hold the trunking steady and make slow, even cuts to get a straight edge – a PVC cutter will give you a cleaner cut than a hacksaw for thinner trunking, but a hacksaw works fine for thicker, larger sections. After cutting, use sandpaper to smooth down any rough edges on the cut ends, this will prevent sharp plastic from damaging your cables and make it easier to fit the connectors.
Another important step is mounting the trunking base to your surface before adding cables and the cover. Whether you use adhesive or screws depends on the surface you are working on and the weight of the cables you will be holding. For smooth walls or plasterboard, strong double-sided mounting adhesive or construction adhesive works well for lightweight trunking, and it leaves no visible holes in your wall. If you are mounting heavier trunking with lots of cables, or installing it on a concrete or brick wall, screws are a more reliable long-term option. Use your level as you position the base to make sure it is straight – a crooked trunking installation will look unprofessional even if it works properly, so take an extra minute to check your alignment before the adhesive sets or you drive in the screws. Once the base is in place, let the adhesive cure fully if you are using it, usually for around 24 hours, before adding cables to make sure it holds securely.
After the base is secured, you can add your cables and fit the trunking cover to finish the job. Gently arrange all your cables inside the base of the trunking, try not to cram too many cables in, and leave them a little loose to avoid putting pressure on the connections. If you are running multiple types of cables, such as power cables and data cables, some trunking designs come with internal dividers to keep them separated, which reduces interference for signal cables. Once your cables are arranged neatly, simply clip the cover onto the base – most PVC trunking is designed with a snap-fit cover that does not need any extra tools or fasteners, which makes it easy to open later if you need to add or remove cables. For any joints between sections, push the connectors firmly into place to keep the installation secure and prevent dust from getting inside the trunking.
Finally, there are a few extra tips that will help you get the best result from your PVC cable trunking installation. If you want your trunking to blend into your wall, you can paint it to match your wall color – PVC takes most types of paint well, just make sure you clean it first and use a primer designed for plastic if you are using latex paint. Avoid running trunking through areas where it might be damaged by moisture or heavy impact, unless you buy moisture-resistant or impact-rated PVC trunking designed for those environments. Always check local electrical codes before running new electrical wiring, to make sure your installation meets safety requirements for your area.
Overall, learning how do I PVC cable trunking is a straightforward DIY project that does not require specialized skills or expensive tools, and it gives you a huge improvement in the safety and appearance of your wiring. By following these simple steps, you can turn a mess of loose cables into a clean, organized installation that protects your wiring and keeps your space looking neat. Whether you are a beginner DIYer or an experienced hobbyist, PVC cable trunking is a practical solution that delivers long-lasting results with minimal effort.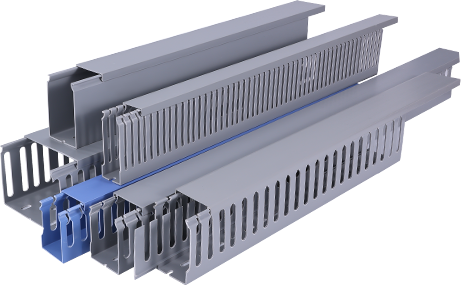
Leave a Reply