Whether you are completing a home renovation, setting up a home office, or upgrading a commercial electrical system, messy and unprotected cables pose both safety hazards and aesthetic issues. PVC wire duct, also known as PVC cable trunking, has become one of the most popular solutions for organizing and protecting electrical wires and data cables thanks to its affordability, durability, and ease of installation. This tutorial will walk you through everything you need to know to select, prepare, and install PVC wire duct correctly, helping you achieve a clean, safe, and professional-looking cable management result. Before starting any installation project, it is critical to understand the basics of PVC wire duct and select the right product for your specific needs. PVC wire duct is a rigid or semi-rigid channel made from polyvinyl chloride, designed to enclose and route electrical cables along walls, ceilings, or baseboards. It comes in a wide range of sizes, from narrow 10mm x 10mm ducts for small data cables to large 100mm x 100mm ducts for multiple high-voltage power cables. When choosing your PVC wire duct, first calculate the total diameter of all cables you plan to enclose, and select a duct with 20-25% extra internal space to accommodate future cable additions. You should also consider the installation location: for indoor use, standard white or gray PVC ducts work perfectly, while for outdoor or moisture-prone areas like basements or garages, choose a UV-stabilized, moisture-resistant PVC variant to prevent cracking or degradation over time. Once you have selected the correct PVC wire duct, the next step in this tutorial is to prepare your workspace and gather all necessary tools. Proper preparation saves time and prevents mistakes during installation. First, turn off the power to any electrical circuits you will be working on at your main breaker panel, and test the wires with a non-contact voltage tester to confirm they are de-energized – this is a non-negotiable safety step that you should never skip. Next, gather your tools: you will need a tape measure, pencil, hacksaw or PVC cutting tool, level, drill with appropriate bits, screws or adhesive mounting tape, a deburring tool, and a screwdriver. Mark the route of your PVC wire duct on the wall or surface using a pencil and level, ensuring the route follows the straightest possible path along studs or wall joints for easy mounting. If you need to turn corners or change direction, pre-plan where you will add 90-degree elbows, T-joints, or other PVC connectors that match your duct size. With preparation complete, you can start cutting and mounting the PVC wire duct. First, measure the length of each marked section, and transfer the measurement to your PVC duct. Use a hacksaw or specialized PVC cutter to make a straight, clean cut – avoid jagged edges, as they can make it difficult to fit the cover on later and may damage cable insulation. After cutting, use a deburring tool or sandpaper to smooth the cut edges, removing any sharp burrs that could cause injury or cable damage. Once all sections are cut, test fit the duct along your marked route to confirm all pieces fit together correctly with the connectors. For mounting, you have two common options: if you are installing on a drywall or wooden surface, drilling and screwing the base of the duct to the wall provides the most secure hold, with screws placed every 30 to 40 centimeters along the length. If you prefer a no-drill installation for temporary setups or rented spaces, strong double-sided adhesive mounting tape designed for heavy loads works well for smaller, lighter ducts. After installing the base and connecting all sections with the appropriate connectors, it is time to add your cables. After the base of the PVC wire duct is securely mounted, you can route your cables and install the cover. Gently arrange all your cables inside the duct base, avoiding tight bends that could damage cable insulation or restrict signal flow for data cables. Leave a small amount of slack at connection points to avoid putting tension on plugs or terminals. Once all cables are neatly arranged, snap the cover onto the base of the PVC duct – most modern PVC wire ducts feature a snap-on cover design that does not require additional tools or fasteners, making it easy to remove the cover later if you need to add or re-route cables. Check that the cover is fully secured along the entire length, with no gaps or loose sections that could expose wires. After installation, take a few minutes to clean up the workspace, removing any cut PVC scraps and dust, and restore power to the circuit if you were working with electrical cables. There are a few common mistakes to avoid when following this tutorial to install PVC wire duct. One of the most frequent issues is choosing a duct that is too small for the number of cables, which leads to bulging covers that do not stay in place and increased heat buildup around power cables. Skipping the step of smoothing cut edges is another common mistake that can lead to accidental cuts during installation or damage to cable insulation over time. Additionally, always ensure that your installation complies with local electrical codes, especially when working with high-voltage power cables – some areas have specific requirements for how exposed cables must be enclosed, so checking local regulations before you start can prevent future issues. PVC wire duct remains one of the most accessible and effective cable management solutions for both DIY and professional projects, and following this step-by-step tutorial allows even beginners to complete a clean, safe installation. By selecting the right size, preparing carefully, cutting accurately, and following basic safety guidelines, you can transform a messy tangle of cables into an organized, protected system that improves both safety and the overall appearance of your space. Whether you are organizing home entertainment cables, setting up a new workshop, or upgrading an office network, PVC wire duct offers a durable, low-cost solution that will last for years with minimal maintenance.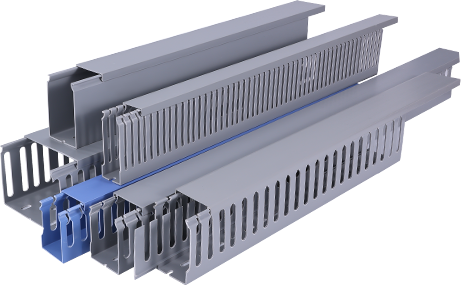
A Step-by-Step Tutorial: Installing PVC Wire Duct for Safe and Organized Cable Management
by
Tags:
Leave a Reply